
Struggling to pair your JLab earbuds? It’s a common hurdle that can stop your favorite tracks in their tracks. Many enjoy the crisp sound and ease of JLab earbuds, but when they don’t connect, it can be a real snag. This guide is here to clear up the confusion and help you get your earbuds paired up again. We’ll share some simple steps to sort out these pairing problems. By the end, you’ll be ready to dive back into your music or podcasts without a hitch. Let’s get those earbuds connected and your tunes flowing smoothly once more.
Key Takeaways
- Often, JLab earbuds won’t pair because they’re still connected to another device.
- A dead battery or the earbuds being off can prevent pairing.
- Failing to properly disconnect from a previous device might cause issues.
- Restarting or resetting the earbuds can fix glitches in the firmware.
- Nearby Bluetooth devices can disrupt the connection.
- Problems with the device you’re trying to connect to might block pairing.
- Physical damage to the earbuds can also hinder their performance.
- If these steps don’t work, JLab’s customer support can offer more help or a replacement under warranty.
Solving JLab Earbuds Pairing Issues
If you’re having trouble connecting your JLab earbuds, don’t worry. We’ve got some easy steps to help fix the problem so you can get back to enjoying your music and calls.
1. Restart Your Devices:
When facing issues pairing your JLab earbuds, the first step should be to restart both your earbuds and the device you’re trying to pair them with, such as a mobile phone, laptop, PC, or Mac. Restarting often solves many connectivity problems.
To restart your JLab earbuds, place them in their charging case, which should automatically turn them off. Then, take them out to turn them back on. If your earbuds don’t turn off automatically when placed in the case, you may need to turn them off manually, depending on the model. For example, to turn off JLab Jbuds Air manually, press and hold the button on each earbud for 5 seconds.
If the earbuds are left on and not connected to any device, they will automatically turn off after three minutes to save battery. To turn them on again, press the touchpad until you hear a ‘hello’ voice prompt. To turn them off, press and hold the touchpad until you hear a ‘Goodbye’ voice prompt.
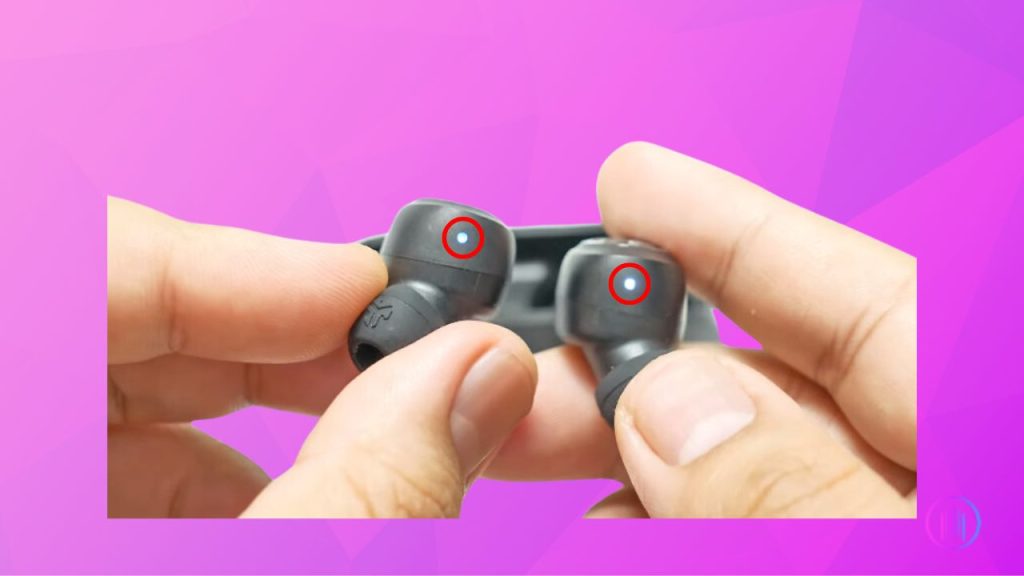
After restarting your earbuds, make sure they are in pairing mode.When one earbud flashes blue and white and the other stays white, they’re ready to pair. Some models might have both earbuds flashing.
Likewise, it’s a good idea to restart the device you’re trying to pair with your earbuds. Restarting can clear up any previous connectivity issues and make the pairing process smoother.
2. Charge Your Earbuds:
If restarting your earbuds didn’t fix the issue, the next step is to make sure your Jbuds are fully charged. A low battery can often be the hidden reason why earbuds struggle to pair with your device. Imagine you’re ready to unwind with your favorite music, only to find your earbuds won’t connect, all because of a drained battery. To avoid this frustrating scenario, ensure your earbuds are charged up. Think of it as preparing for a journey; a full charge is the energy your earbuds need to link up smoothly with your device, turning potential disappointment into a seamless listening experience. For more details on resolving issues when your JLab earbuds are not charging, check out our comprehensive guide.
3. Clear Previous Pairings:
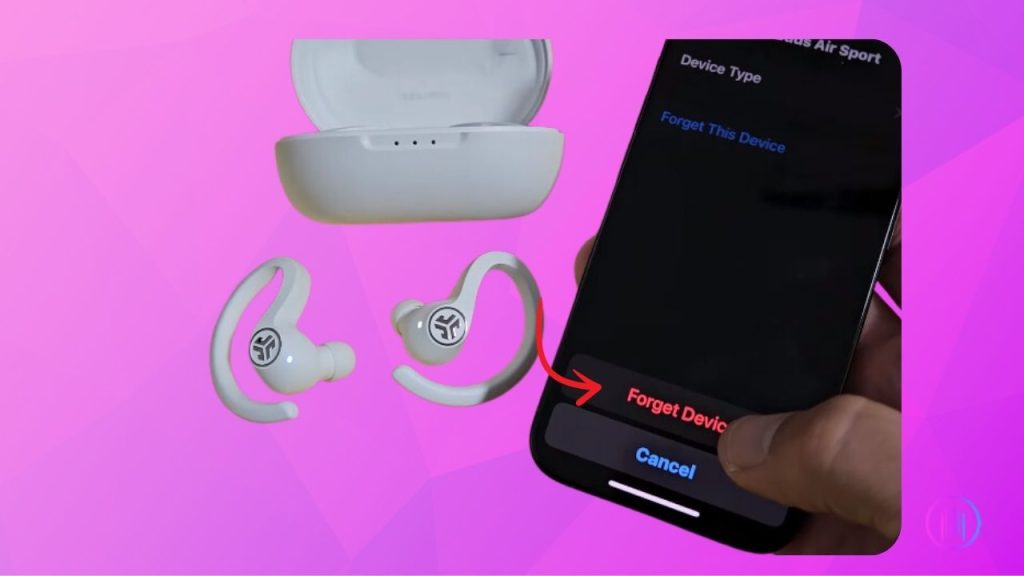
When you’re trying to pair your JLab earbuds anew but they’re already linked to another device, the first step is to forget or unpair them. To do this, head into the Bluetooth settings on your phone or tablet and find your JLab earbuds listed under paired devices. Then, select the option to ‘forget’ or ‘unpair’ next to your earbuds’ name. This process frees your earbuds from previous connections, making them ready for a new pairing.
Additionally, it’s crucial to ensure no other active Bluetooth devices are within your earbuds’ range. Sometimes, your earbuds might automatically connect to another device if its Bluetooth is on. You can check this by going to the Bluetooth settings on your phone and looking at the list of available devices. If you see any other active devices, turn them off first. Then, try pairing your JLab earbuds with your device again.
4. Clear the Way for Connection:
Sometimes, the invisible waves that connect our earbuds to our devices get blocked by the simplest things. Walls, furniture, or even the distance from one room to another can be enough to disrupt the signal. It’s like trying to have a conversation through a closed door; it just doesn’t work as well. So, take a moment to look around. Make sure your JLab earbuds and the device you’re pairing them with are close enough to “hear” each other without any obstacles in the way. A clear, unobstructed path not only strengthens your connection but ensures your music or calls come through crystal clear.
5. Resetting Your JLab Earbuds:
Resetting your JLab earbuds can be a universal and effective solution for various issues, whether you’re facing pairing difficulties, sound glitches, or other problems. The first step in the troubleshooting process is to determine the exact model of your earbuds, as the reset procedure can vary between different models. You can identify your model by checking the FCC ID located at the bottom of the charging case, which will help you match your earbuds to the correct model on JLab’s user manual website. Once you have this information, you can find model-specific reset instructions in the Troubleshooting section, should the general reset method provided here not be suitable. This general reset approach works with many JLab models, such as JLab Go Air, JLab Epic Air Sport, and JLab Epic Air ANC, and is often successful in resolving a wide range of issues.
To reset your earbuds, follow these steps:
- Place your earbuds in the charging case to prepare them for resetting.
- ‘Forget’ or ‘Unpair’ the JLab earbuds from your device’s Bluetooth settings to eliminate any existing connections.
- Tap the back of one earbud seven times while it’s still in the charging case. A series of four blue blinks indicates the earbud is resetting. Repeat with the other earbud.
- After resetting both earbuds, remove them from the case. They should automatically enter pairing mode, signaled by one earbud showing a solid white light and the other blinking blue and white.
- Attempt to pair the earbuds with your device again. If the initial attempt is unsuccessful, you may need to repeat the reset procedure.
6. Check Compatibility:
Even after trying all troubleshooting steps, if your JLab earbuds still won’t connect, it might not be the earbuds at fault. Sometimes, the device you’re trying to pair with might not be compatible with your earbuds. To test this, try pairing your earbuds with a different device. If they work perfectly fine with another smartphone, tablet, or computer, the issue likely lies with the original device, not your earbuds. This step can help pinpoint where the problem really is, saving you time and effort in troubleshooting and ensuring you get back to enjoying your music without unnecessary delays.
Contact JLab Customer Support
Reaching out to JLab support can be a helpful next step when facing issues with your earbuds. If your earbuds are under warranty, you might have the option to exchange them for a new pair. This can be a straightforward solution to your problem. However, if your earbuds are no longer covered by warranty, don’t worry. You can still get professional help by visiting JLab’s customer support. When you contact them, remember to mention the specific troubleshooting steps you’ve already tried. This will give the support team a clear starting point to offer you the most effective assistance, ensuring you get back to enjoying your audio experience as soon as possible.
Conclusion
Solving pairing issues with JLab earbuds usually comes down to a few straightforward steps. By trying out the tips shared in this guide, most problems can be sorted, letting you get back to enjoying your music, podcasts, or calls without any fuss. If you’ve gone through all the steps and still face challenges, remember that JLab’s customer support is ready to step in and help. Whether it’s a simple fix or needing a replacement, they’ve got you covered. So, keep this guide handy, and never let pairing issues put a damper on your audio experience again.
FAQs
To put your JLab earbuds into pairing mode, you don’t need to do much. Just take them out of their charging case and they should turn on by themselves. If they don’t, there’s usually a button on each earbud that you can press for a few seconds to turn them on. Once they’re on, they might automatically go into pairing mode. If not, pressing and holding the button on the earbuds for about 3 to 5 seconds usually does the trick. You’ll know they’re ready to pair when you see a flashing LED light, which is often blue and white, but sometimes just blue. If you’re having trouble or if your earbuds are a different model, checking the manual or reaching out to JLab’s customer support might help.
If your JLab earbuds aren’t pairing, first turn off your device’s Bluetooth. Then, hold the right earbud’s button until it flashes only white. It’ll flash blue and white at first, but keep holding until it’s just white. Do the same with the left earbud. After that, put them back in their case so they pair with each other. Turn your device’s Bluetooth back on and try connecting again.

I’m Shaun Conroy, an audiophile & founder of HiFi Audios. Holding a Bachelor’s in Sound Engineering, I bring deep expertise in audio devices and offer insights & recommendations to fellow enthusiasts.