Did you just bring in the JBL Soundbar you’ve been eyeing for the last few months?
The excitement is real!
However, now that you have to set up your JBL soundbar with the TV, you’re scratching your head, right? Cause you didn’t think about this part of the story; and have no idea how to connect JBL soundbar to your TV.
So, what to do?
Wait for the Fairy Godmother to come and magically connect the JBL soundbar with your TV. However, that won’t be a good idea, as fairy Godmothers are nothing short of a miracle, and miracles don’t happen in this case. Besides, fairy godmothers, being from ancient times, likely wouldn’t know how to help with modern technology. So waiting for one would be futile.
Don’t worry if the fairies won’t help! We have your back. All you need to do is grab a cup of coffee, sit on a comfy sofa, and continue reading for the next ten minutes to get the answers to all your questions.
Check the Connection Types Your TV Supports
Before embarking on a wild goose chase to connect your JBL soundbar, first, check which types of connections your TV supports. If you’ve tried connecting before and faced issues, you might want to consider resetting your JBL soundbar before starting afresh. You don’t want to get caught trying to fit the square-shaped peg in a round hole, do you?
I assume you don’t want to waste time on incompatible connections! So, the first thing that you need to do is check which connection your TV supports.
Stop right there! Don’t run to call someone to check the connection for you; you can do it yourself.
Simply lean over and check the available ports on the back of your TV. You are expected to find one or two out of these ports: Digital Optical (TOSLINK), HDMI, HDMI ARC, HDMI eARC, and a wireless connection if your TV and soundbar both have Bluetooth connectivity options. Once you identify the available link, setting up the JBL soundbar with your TV will be easier. If you’re new to this, you might also want to read our general guide on how to connect a soundbar to a TV for more background information.
Now that you know how to identify the connection your TV supports, you might want to learn how to connect your JBL soundbar using that connection.
Let’s find out!
Connecting the JBL Soundbar to Your TV Through a Digital Optical

Leaning on the back of your TV, if you find a port with a TOSLINK label, know that you’ve to connect the JBL soundbar to the TV using a Digital Optical connection. This connection is found mainly in some old TV models. So, if you have an old TV, you will most likely have a TOSLINK port for an audio connection.
So, what exactly is a digital optical connection?
This connection uses optical cables, which transmit signals in the form of light instead of electrical signals. Here’s how you can connect your JBL soundbar to a TV through Digital optical. If you’re interested in different ways to set up your sound system, you might also want to learn how to mount a soundbar to a TV.
- Get a digital optical cable of suitable length for connecting your JBL soundbar to the TV.
- Plug in one end of the cable in the TOSLINK port on your TV and the other in the soundbar.
- Now, plug in the TV and JBL soundbar to the power outlet and enjoy high-quality, distortion immune audio in your home theater.
Note that you can only use this connection if both your TV and JBL soundbar have TOSLINK ports. Furthermore, they do not support and transmit all types of audio formats.
With the digital optical connection, you can enjoy compressed audio up to 5.1 channels and Dolby Digital (lossy) audio format.
Using a Simple HDMI Connection
Let’s embark on the road of audio connectivity with a simple HDMI connection!
If you lean on your TV and find a port labeled HDMI and a parallel port on the soundbar, you can connect your JBL soundbar to the TV using this simple HDMI connection.
Trust me; you don’t have to call scientists from NASA to set up the connection for you! You can do it yourself in no time. Here’s what you need to do to set up your JBL soundbar with the TV using a simple HDMI connection.
- Get a high-quality HDMI cable of a suitable length.
- Locate the HDMI port on the back of your TV and plug in one end of the cable in the port.
- Next, find the HDMI port in your JBL soundbar and put the other end of the cable to form the connection.
- Plug the TV and soundbar into the power source, and enjoy the most immersive audio experience with your JBL soundbar now connected to the TV.
The HDMI connection is preferable if either your TV or JBL soundbar doesn’t support HDMI ARC. However, if you can find an ARC port in your TV and JBL soundbar, you must use the HDMI ARC connection.
Continue reading to find out how to set up an HDMI ARC connection.
Connecting the JBL Soundbar Through HDMI ARC
The advent of HDMI ARC was revolutionary for home theaters, enhancing both audio and video performance in ways previously unimagined.
So, if you lean on your TV and find a port saying HDMI ARC, know that you’ve hit the jackpot. With this cherry on top of the sundae, you’ll experience audio and video that will blow your mind away.
How do you connect your JBL soundbar to the TV using an HDMI ARC connection?
It’s no rocket science!
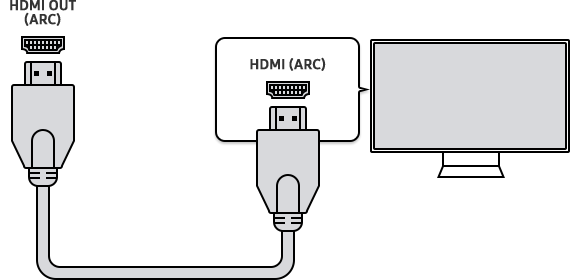
All you need to do is get a high-quality HDMI cable (preferably an HDMI 2.0 standard cable) and put one end of the cable in the HDMI ARC port of the TV and the other one in the HDMI port of your soundbar. Now, plug the TV and soundbar into the power outlet, and you’re good to go.
With HDMI ARC, you can enjoy several benefits; it provides good audio quality and comes with an Audio Return Channel. The audio return channel helps the audio and video signal travel in both directions.
For instance, you have two more devices to connect to your TV; now, in normal circumstances, you’ll need a separate audio connection from the devices to the soundbar. However, for HDMI ARC, all you need to do is to connect the devices to your TV and connect the TV to the JBL soundbar using the HDMI ARC connection. This way, your TV will become a central hub; you’ll see the video on the TV, and sound signals will travel through the HDMI ARC connection to the soundbar for an immersive listening experience.
Isn’t it amazing?
Another benefit of connecting your JBL soundbar to a TV using an HDMI ARC connection is the CEC (Consumer Electronics Control). This feature lets you control your JBL soundbar and other connected devices using a single remote, i.e., a TV remote. However, you might have to activate the CEC and ARC functions from your TV settings. In most cases, the option is activated by default; but it’s better to confirm the activation by checking the settings.
Furthermore, with an HDMI ARC connection, you can enjoy several audio formats, including 5.1 channels of uncompressed, compressed sounds up to 7.1 channels, Dolby Digital and Dolby Digital Plus (lossy), and DTS digital surround sound (lossy).
Now, this truly sounds like hitting the Jackpot!
Using a Bluetooth Connection
The last method of connecting your JBL soundbar to the TV is via Bluetooth. If your TV and JBL soundbar have Bluetooth options, you can easily connect these two. Now, for this connection, you don’t need to purchase any type of cable; it’s a wireless connection between the two devices.
Here’s what you can do to connect JBL soundbar to the TV.
- Turn on your TV and JBL soundbar.
- Put your JBL soundbar in pairing mode by pressing and holding the Bluetooth button for a few seconds until the blue light on the JBL soundbar starts flashing like a disco light.
- Go to your TV settings, and enable the Bluetooth option. Your TV will start searching for nearby devices.
- Look for your JBL soundbar in the list of available devices and tap on it.
- Wait for the connection; when the flashing blue light on the JBL soundbar turns solid, you have successfully connected the JBL soundbar to the TV via Bluetooth.
To avoid any trouble with the Bluetooth connection, ensure that all the other Bluetooth devices are turned off during the process and keep both devices in range.
Which Connection is Better?
Which one should you choose if your TV and JBL soundbar have HDMI ARC and a Digital Optical connection?
For its several benefits, HDMI ARC is a suitable option in this case. It provides an audio return channel, which reduces the wire cluster and supports high-quality audio formats, including 5.1 channels of uncompressed, compressed sound up to 7.1 channels, Dolby Digital and Dolby Digital Plus (lossy), and DTS digital surround sound (lossy); which are not supported by the Digital Optical connection.
Furthermore, the HDMI ARC connection also comes with the CEC feature, allowing the user to control multiple devices with a single remote, eliminating the need for a universal remote or multiple remotes.
Therefore, HDMI ARC is definitely the better option for connecting your JBL soundbar to the TV.
Connect JBL Soundbar to TV and Get Started!
If you’ve read this far, you’re probably eager to check which types of connections your TV supports for hooking up your JBL soundbar. Now all the gibberish written on these ports must be making sense to you. However, if you still can’t figure out what it means, you have definitely missed something, so go back and follow the text from the start to understand what to do and which cable to purchase for connecting your JBL soundbar to the TV.
Finally, play your favorite movie or music and enjoy an immersive audio experience, thanks to the perfect connection between your JBL soundbar and TV.

I’m Shaun Conroy, an audiophile & founder of HiFi Audios. Holding a Bachelor’s in Sound Engineering, I bring deep expertise in audio devices and offer insights & recommendations to fellow enthusiasts.